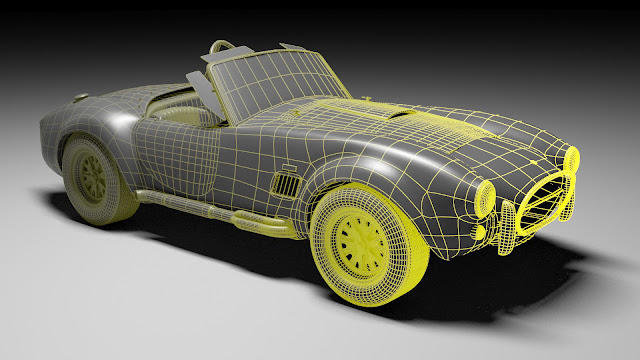
I'm delighted to share with you all the first update of my latest personal project; creating a vehicle visualization based from orthographic sketches. This first post covers a step by step of the modelling construction process of the vehicle and some little hints and tips for people who may find this a daunting task or are simply interested in how I tackle modelling procedures inside 3DS Max
Tip 01: It's really quite handy to arrange your view ports/ screen space in such a way which is comfortable and coherent for the user. I personally quite like to use my second screen to cycle through reference images, which gives me a better idea of the shape and contours of my model WIP and an easy way to compare differences.
My second tip is to utilize your modifier stack so that you can always move down onto the 'fundamental levels' (if you will) to edit the shape and curvature of the model at hand. Creating a mesh should be tackled in the same way as laying the foundations for a home. (If the foundations are incorrect you can guarantee the bricks which come later will not hold). My typical stack could contain a modifier selection something like this...
Shell
Turbosmooth
Symmetry
UVW Map
Edit Poly
...theres no wrong or right way to model.But I would strongly encourage a modifier stack somewhat similar to the above as you can quickly move up and down the stack, and vehicles are generally pretty symmetric (so you're cutting your work flow in half by moving back and forth between the symmetry modifier).
My third tip is to use the see-through and clay modes to help visualize your model WIP. This tip is more a personal choice. See-through mode (Fig.2) can be accessed by RMB and clicking on the object properties tab, allows you to model your mesh and display a reference/orthographic scale drawing to model against. Obviously very handy.
Secondly I like to use clay modelling a lot because I find that various textures and colours inside the viewport can become distracting and hinder the objective of working out the shape of the model. 3DS Max will by default assign different colours to different layers, so if you're solely focusing on modelling and not texturing at the same time, it's pretty easy to end up with a multi coloured viewport.
Without further ado, here are some very quick renders for my work in progress. I hope these quick tips help some of you out there, even though I can appreciate a lot of this is basic or common knowledge. Thanks!
Fig.6: Wheel Mesh Wireframe
Fig.8: AC Cobra Rear Cam

Fig.9: AC Cobra Front Cam Wireframe
Fig.10: AC Cobra Rear Cam Wireframe
Fig.11: Beauty Shot


No comments:
Post a Comment